Синхронизатор браузеров

Synchronizer Introduction
Synchronizer: You can operate a browser profile and synchronize multiple browser profiles to improve your business efficiency.
1. Supports synchronization of extension pop-ups and support cross-screen synchronization.
2. Supports synchronization of all mouse and keyboard actions to the controlled window.
3. Supports browser window arrangement, batch text input, label management and click delay, etc.
Start Sync
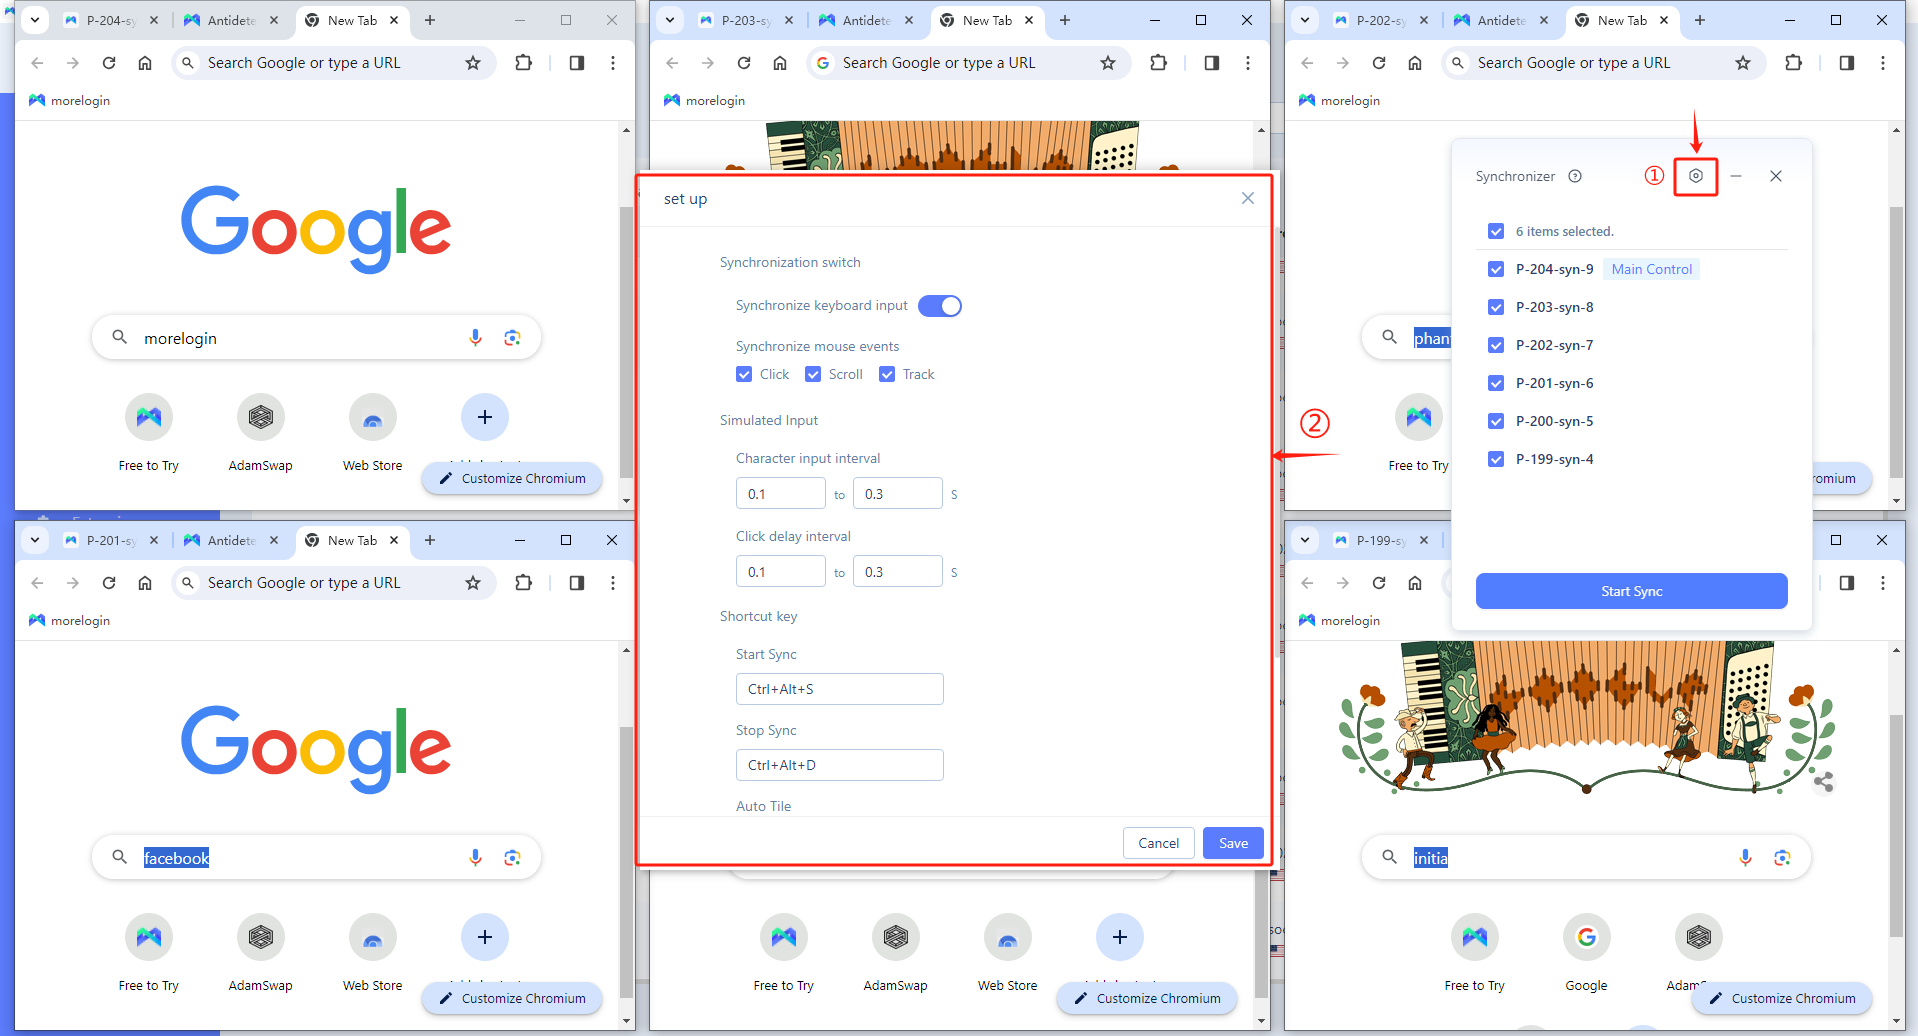
- First, open the browser profile, and then click "Synchronizer" in the upper right corner, check the window that needs to be synchronized, and click "Start Sync".
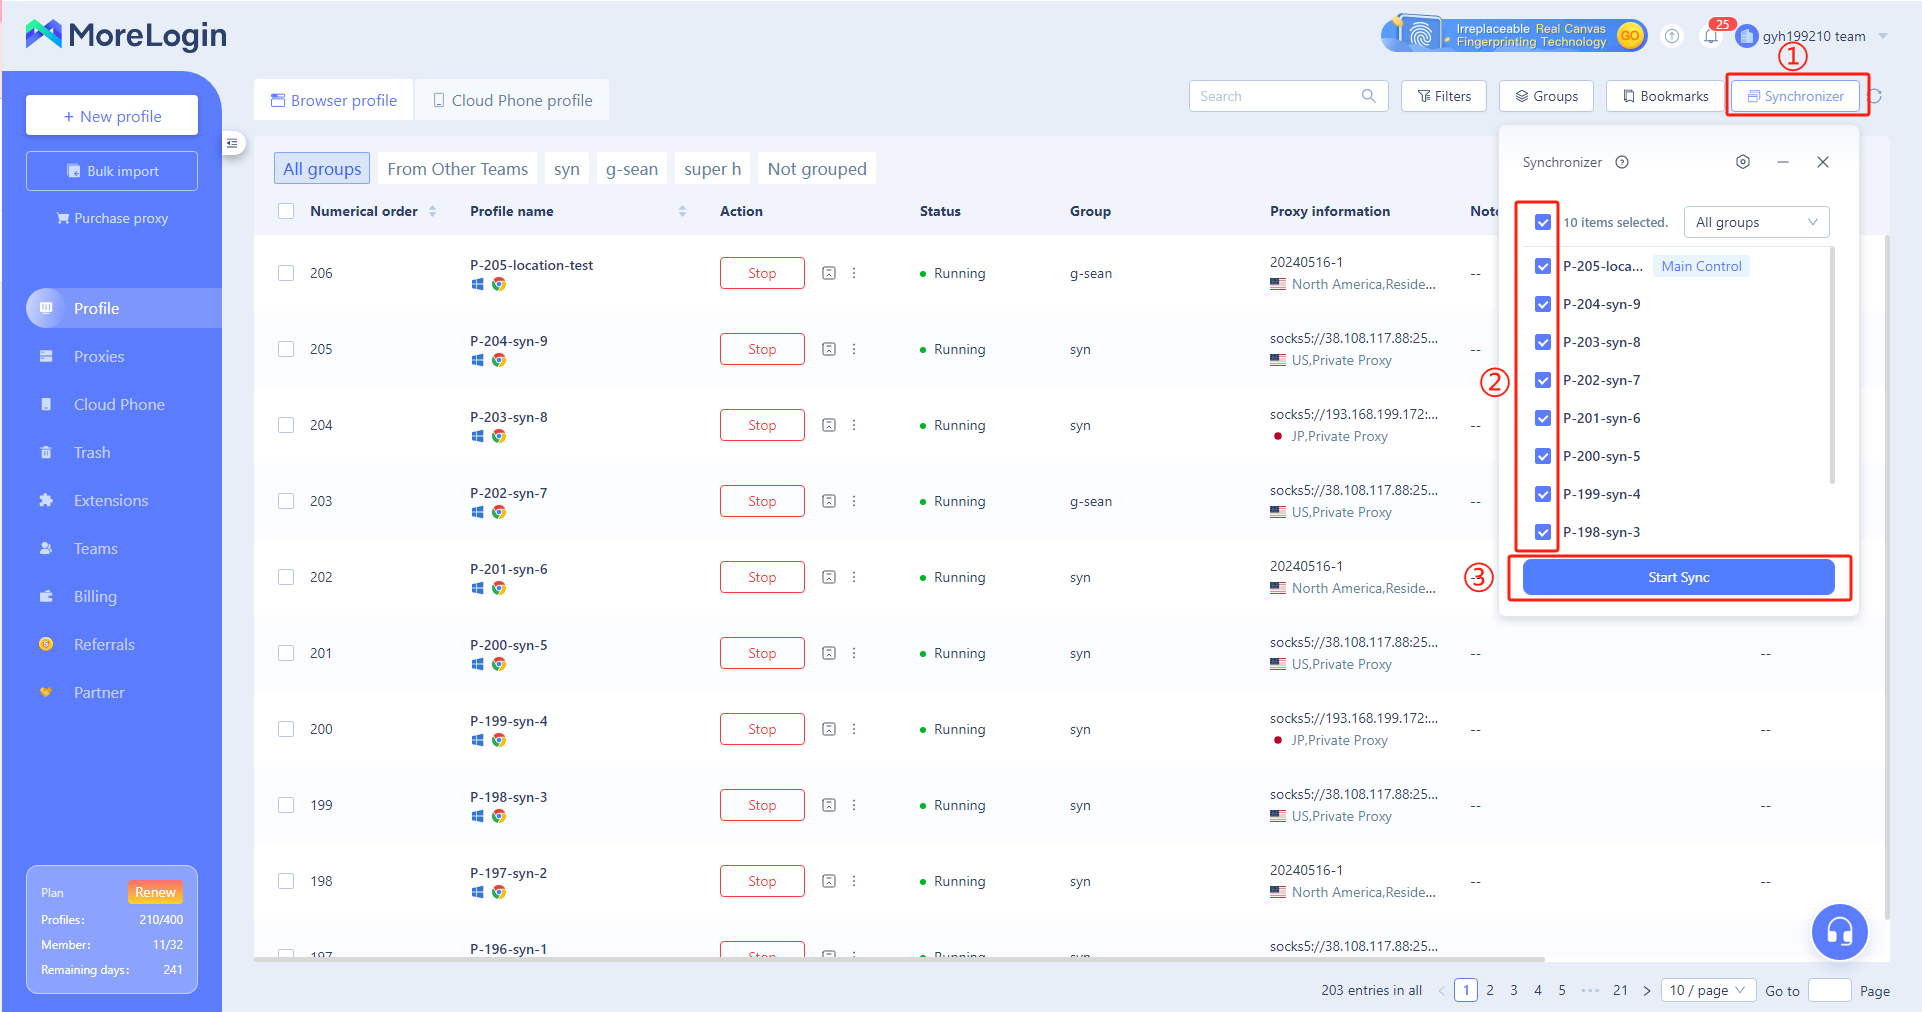
- The operating instructions before starting the synchronizer are as follows:
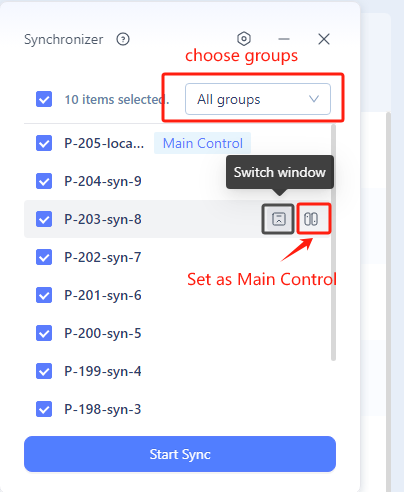
Grouping function: You can select all groups or specify groups for synchronization.
Start synchronization: Select the profiles that need to be synchronized and start the synchronization.
Shortcut key: Ctrl+Alt+S
Set as Main Control: You can select the corresponding browser window and click the "Set as Main Control" shortcut key.
Switch window: You can select the corresponding browser window and click the "Switch Window" shortcut key
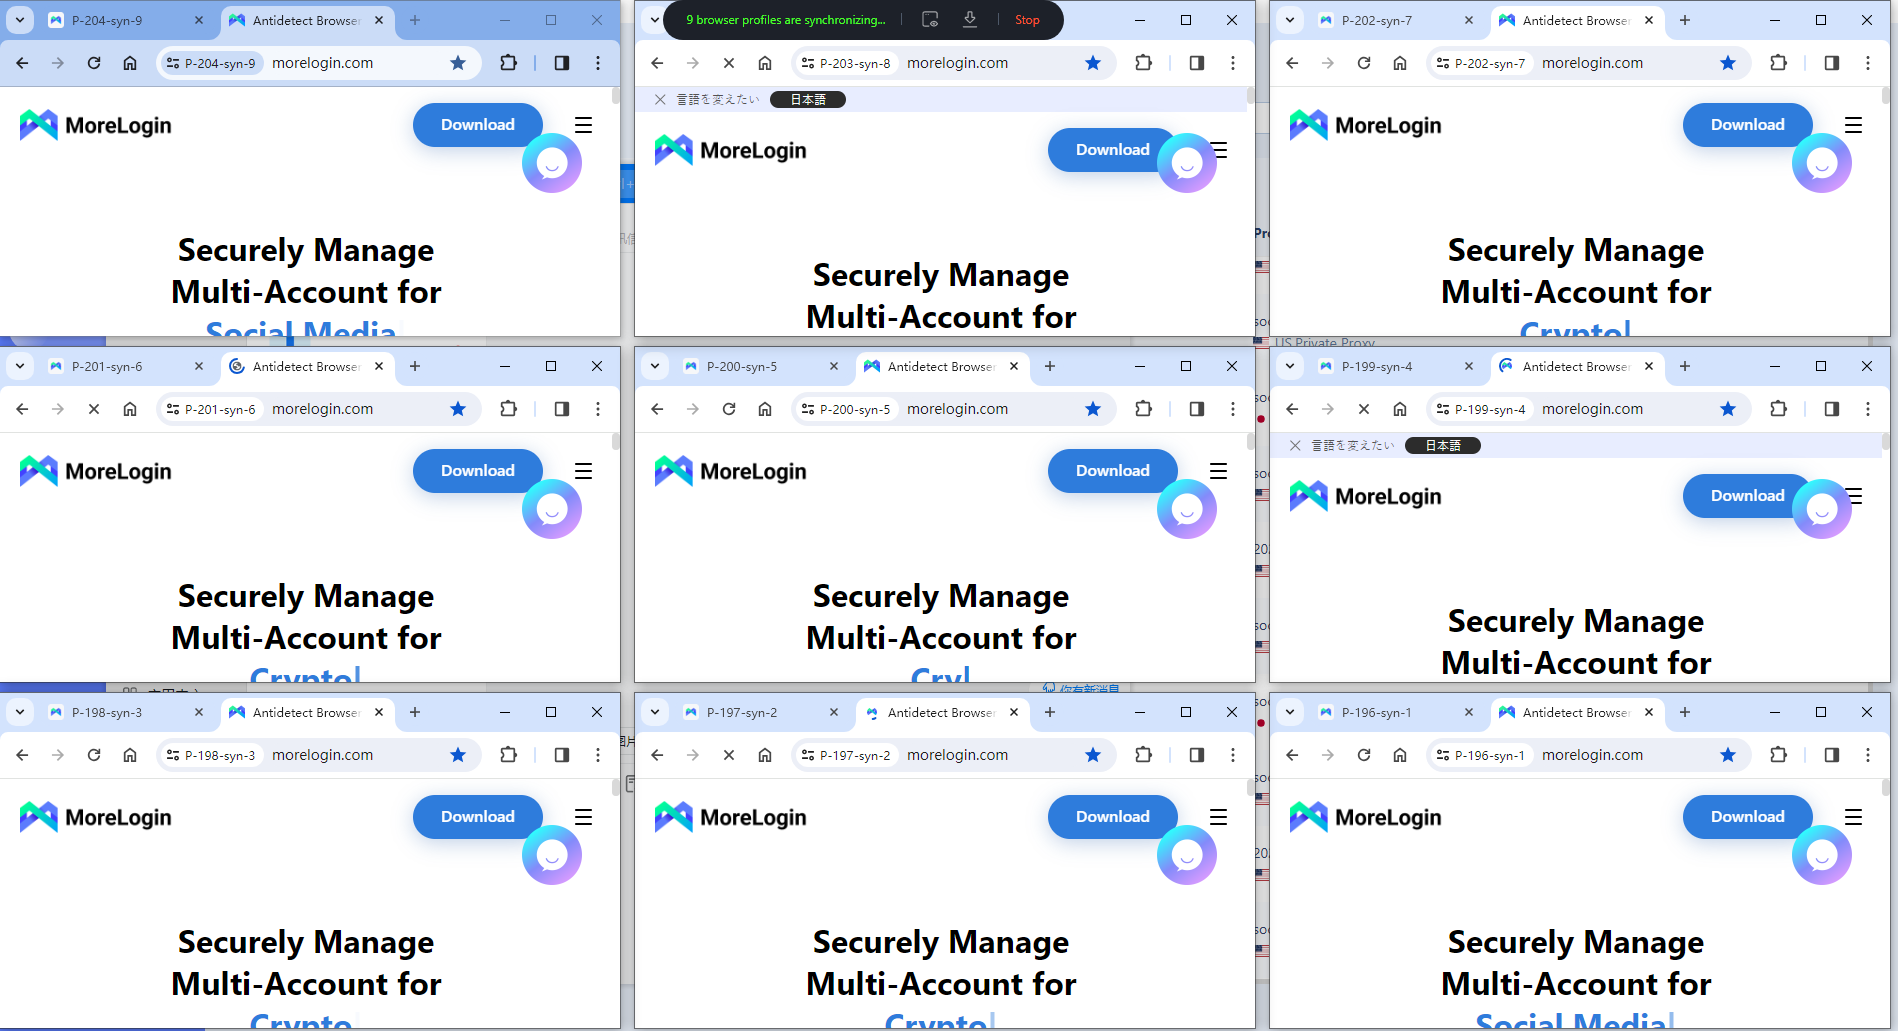
- After starting the synchronizer, you can use the mouse and keyboard to control the main control window to complete the synchronization operation, and quickly complete your business.
Windows Arrangement
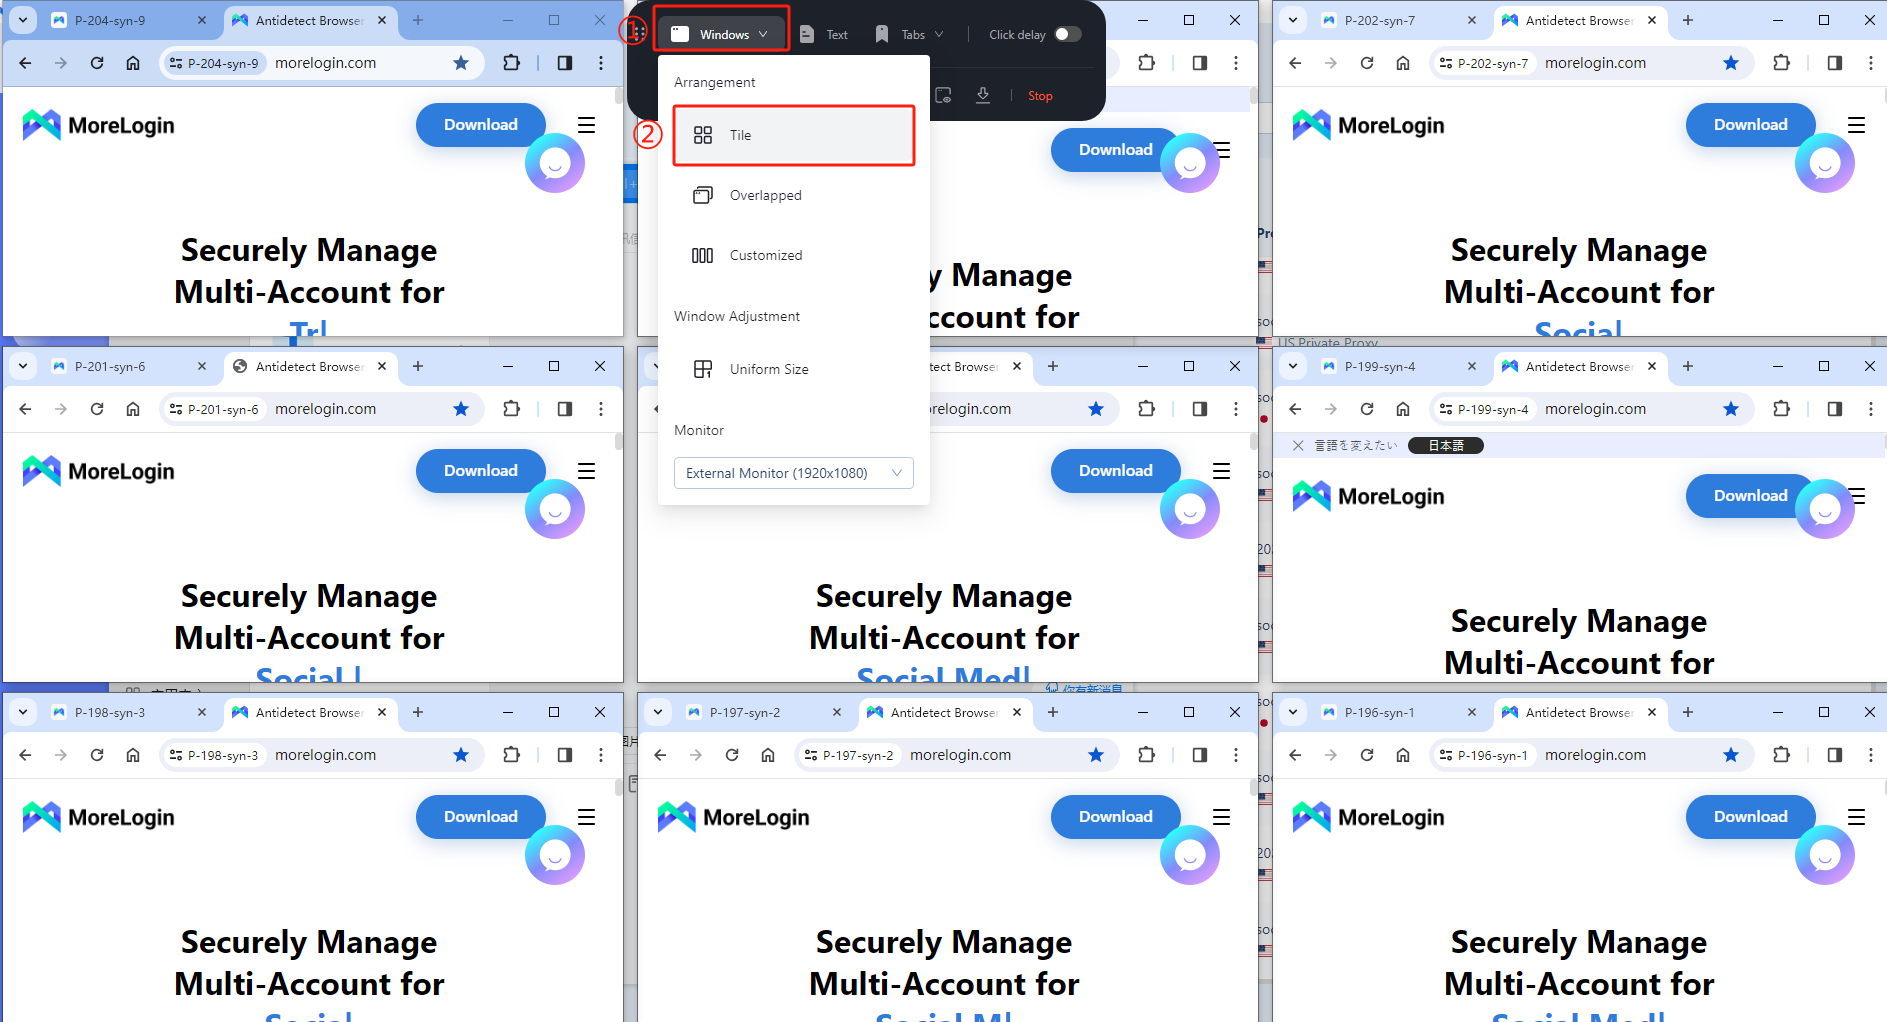
- Windows Arrangement - Tiling: Click the synchronizer toolbar at the top, and click "Windows" - "Arrangement" - "Tiling". The system will recommend an arrangement based on your screen and tile it to your screen. The final display effect of the arrangement is as follows:
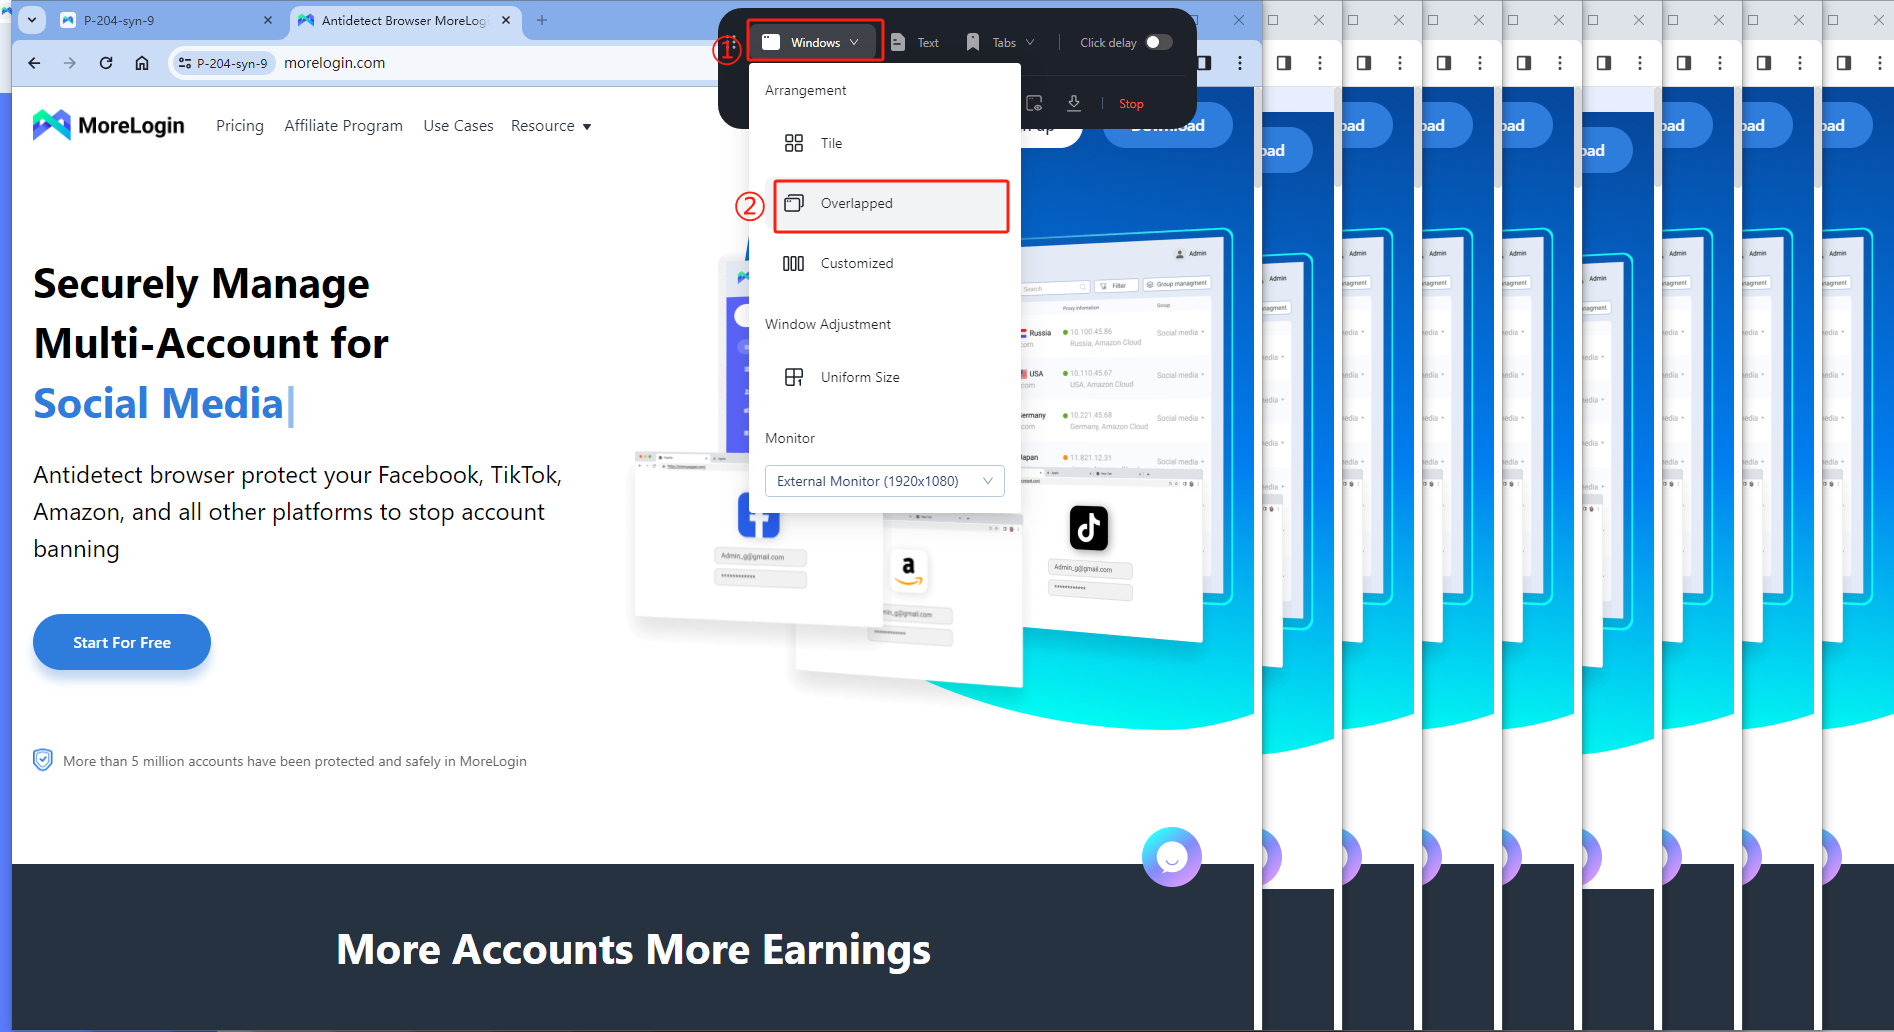
- Window Arrangement - Overlapped: Click the synchronizer toolbar at the top, click "Windows" - "Arrangement" - "Overlapped". It will be displayed on the screen in an overlapped form. The final display effect of the arrangement is as follows:
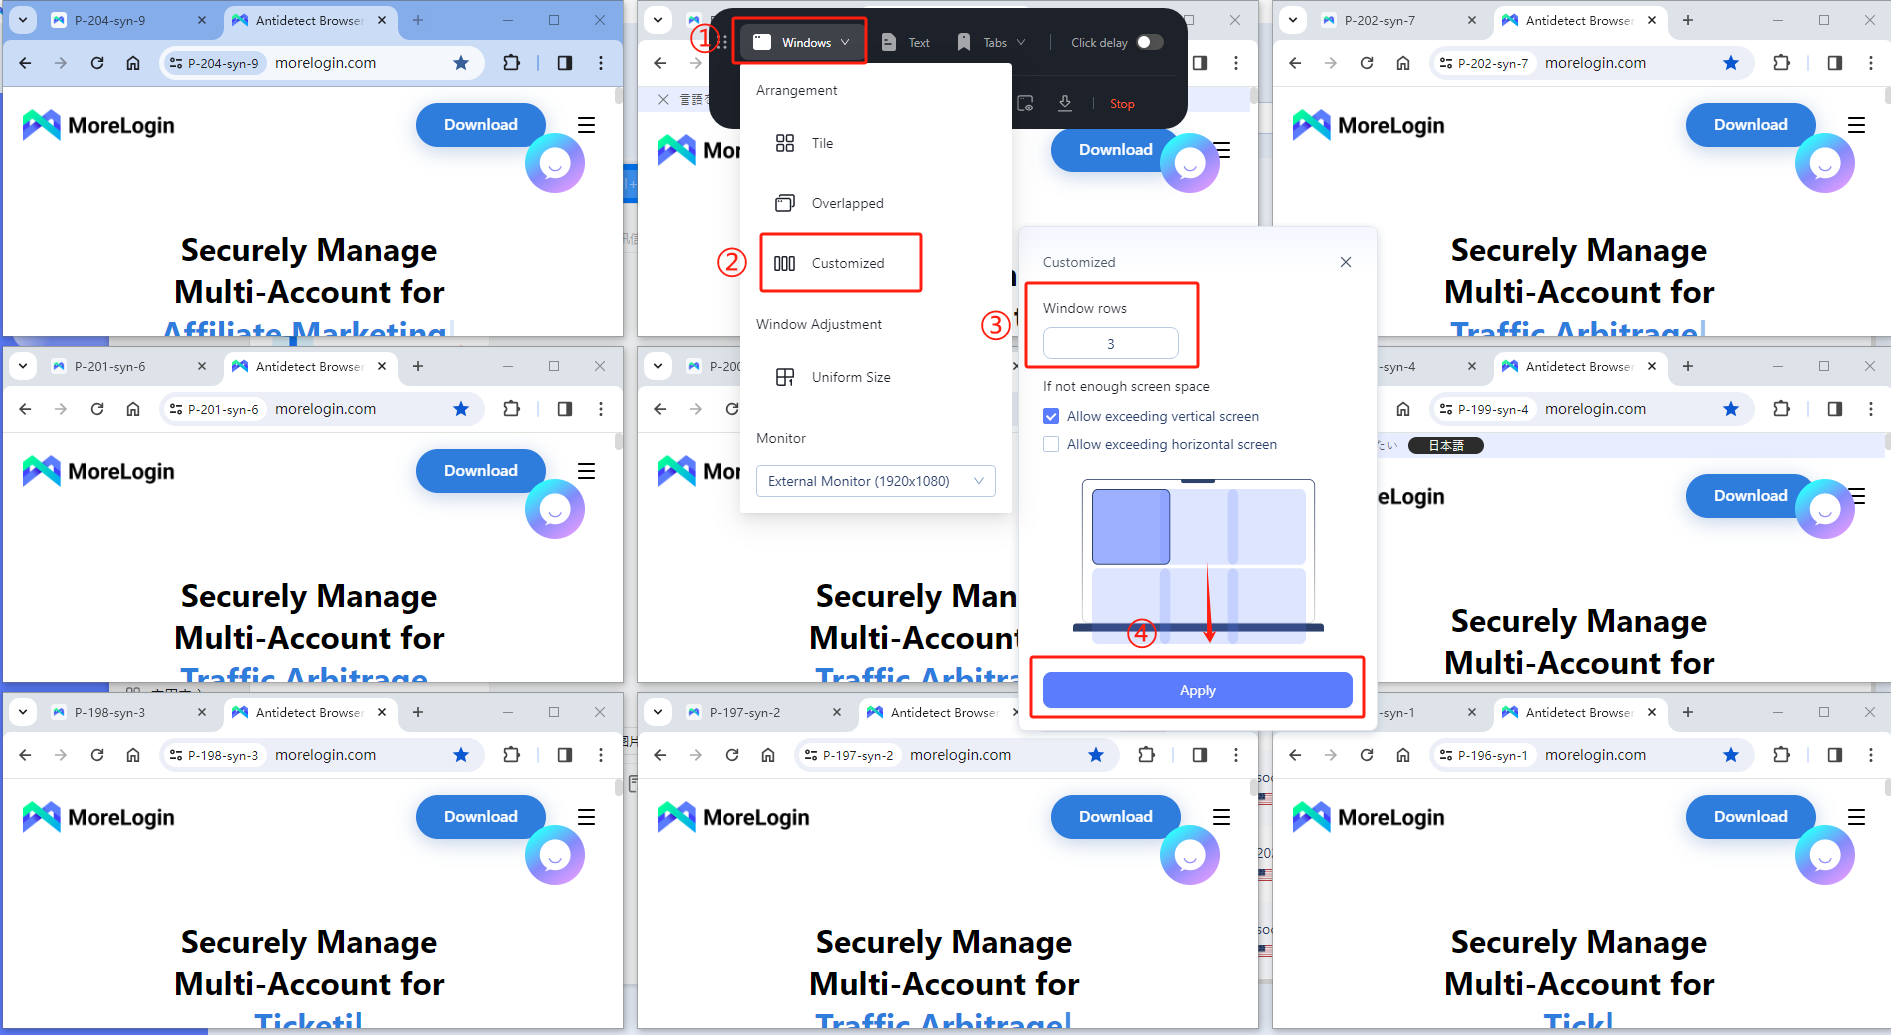
- Window Arrangement - Customized: Click the synchronizer toolbar at the top, click "Windows" - "Arrangement" - "Customized". All windows will be displayed according to the number of rows, and vertical and horizontal screen controls you set.
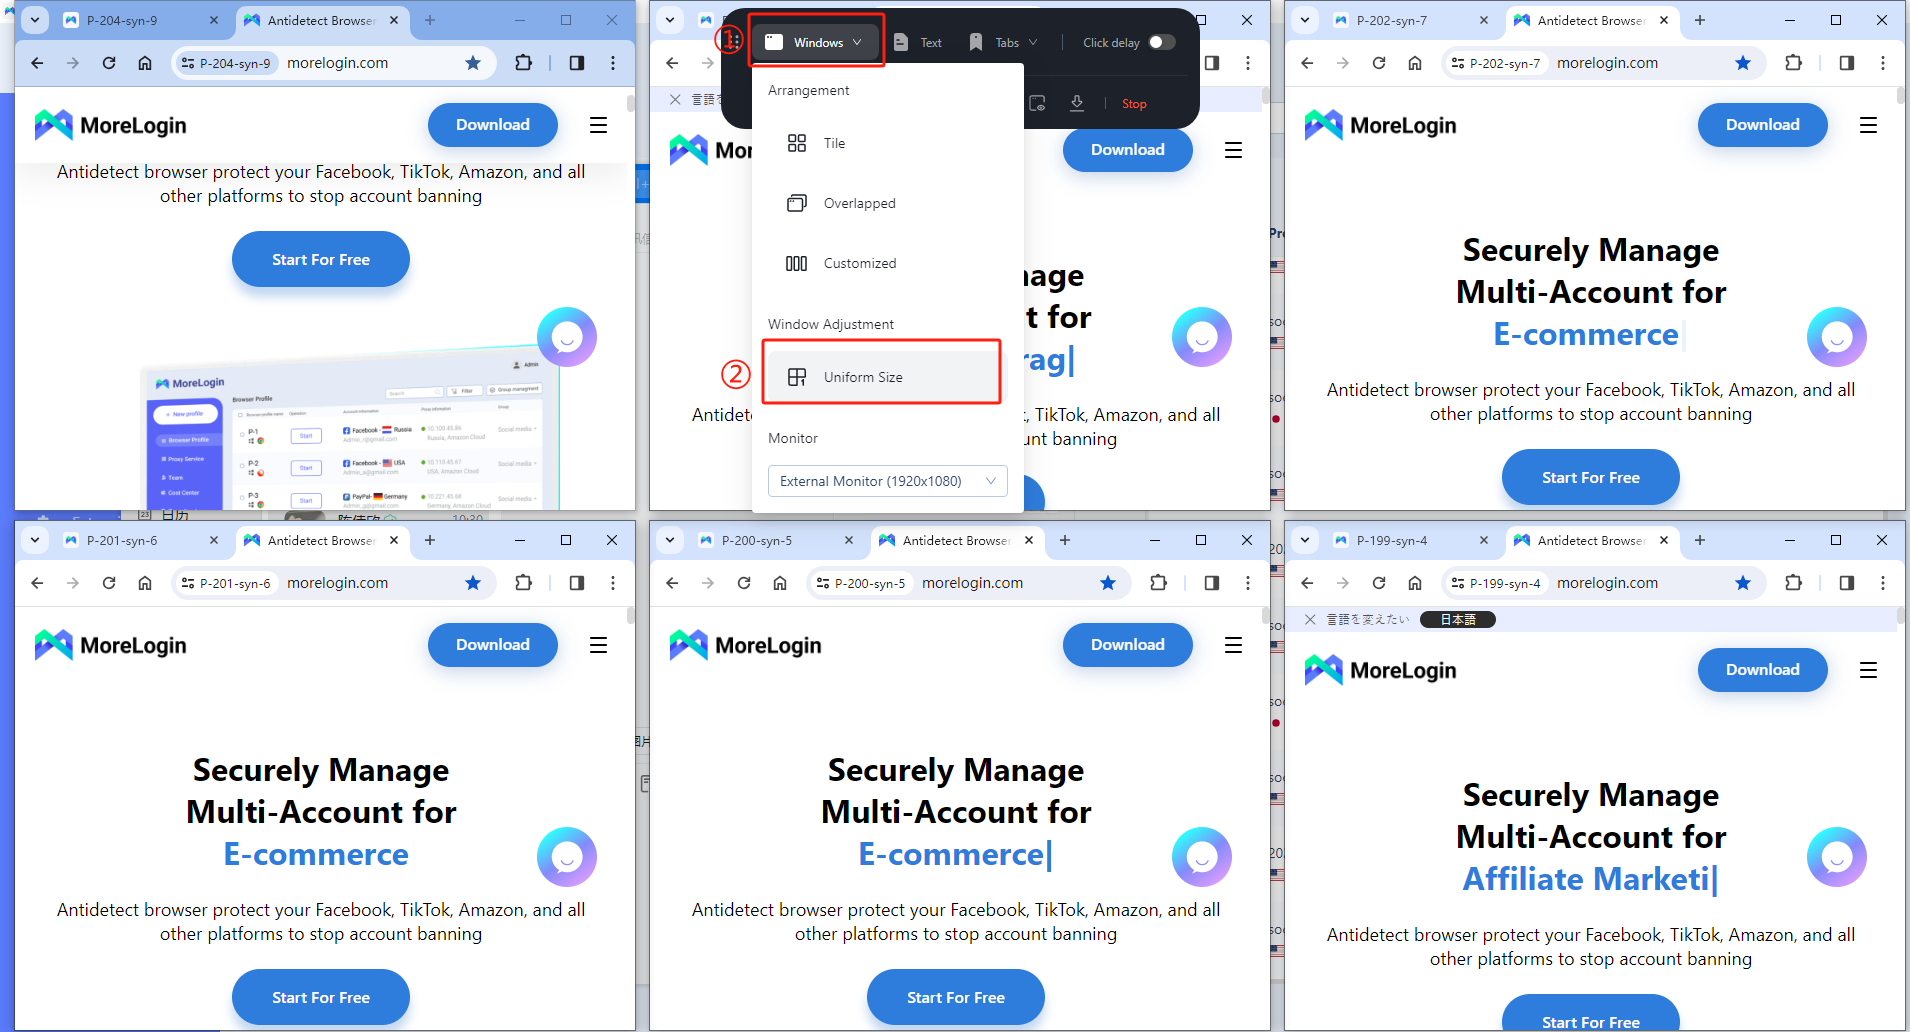
- Windows Arrangement - uniform size: First, set the main control window size according to your needs through the mouse, click the synchronizer toolbar at the top, click "Windows" - "Window Adjustment" - "Uniform Size", the size of all browser windows will be the same as the main control window size.
Text Input
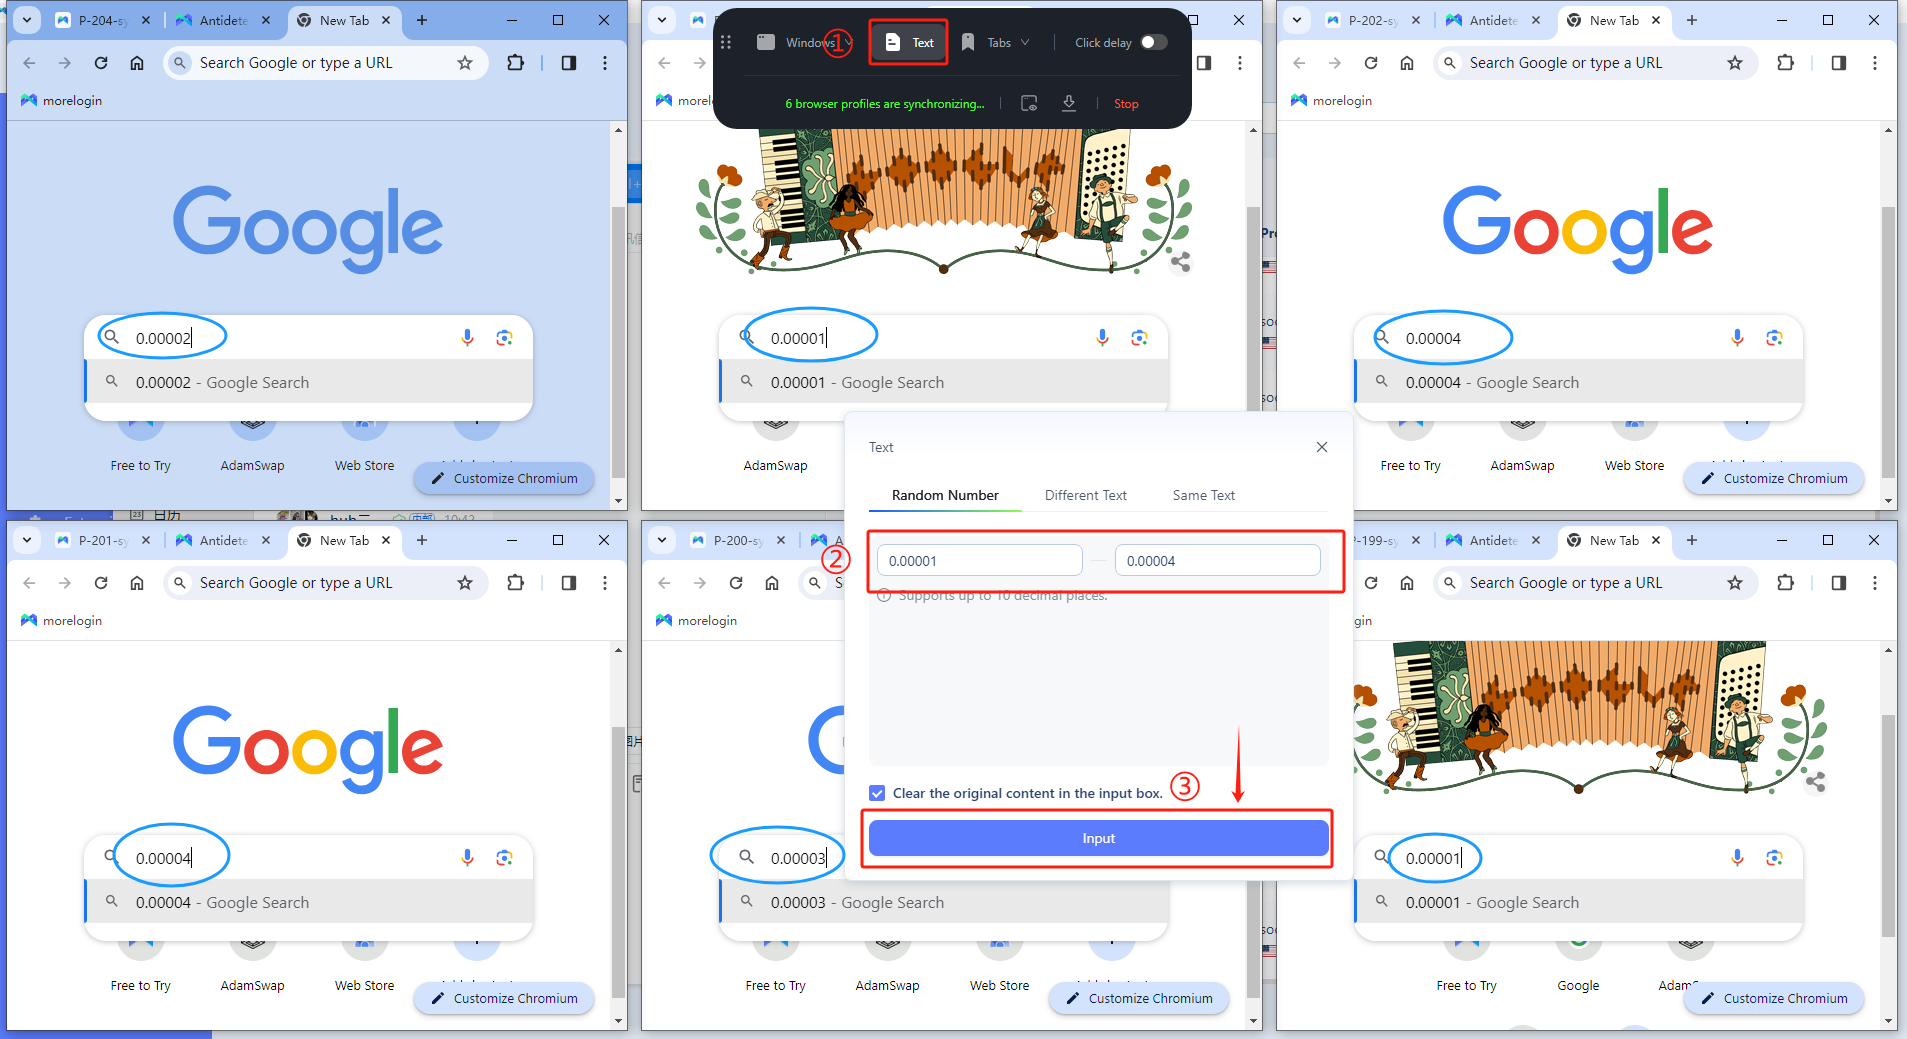
- Text Input - random number: Click the synchronizer toolbar at the top, click "Text" - "Random Number" to fill in the number range, and finally click "Input" to randomly input numbers based on the filled range.
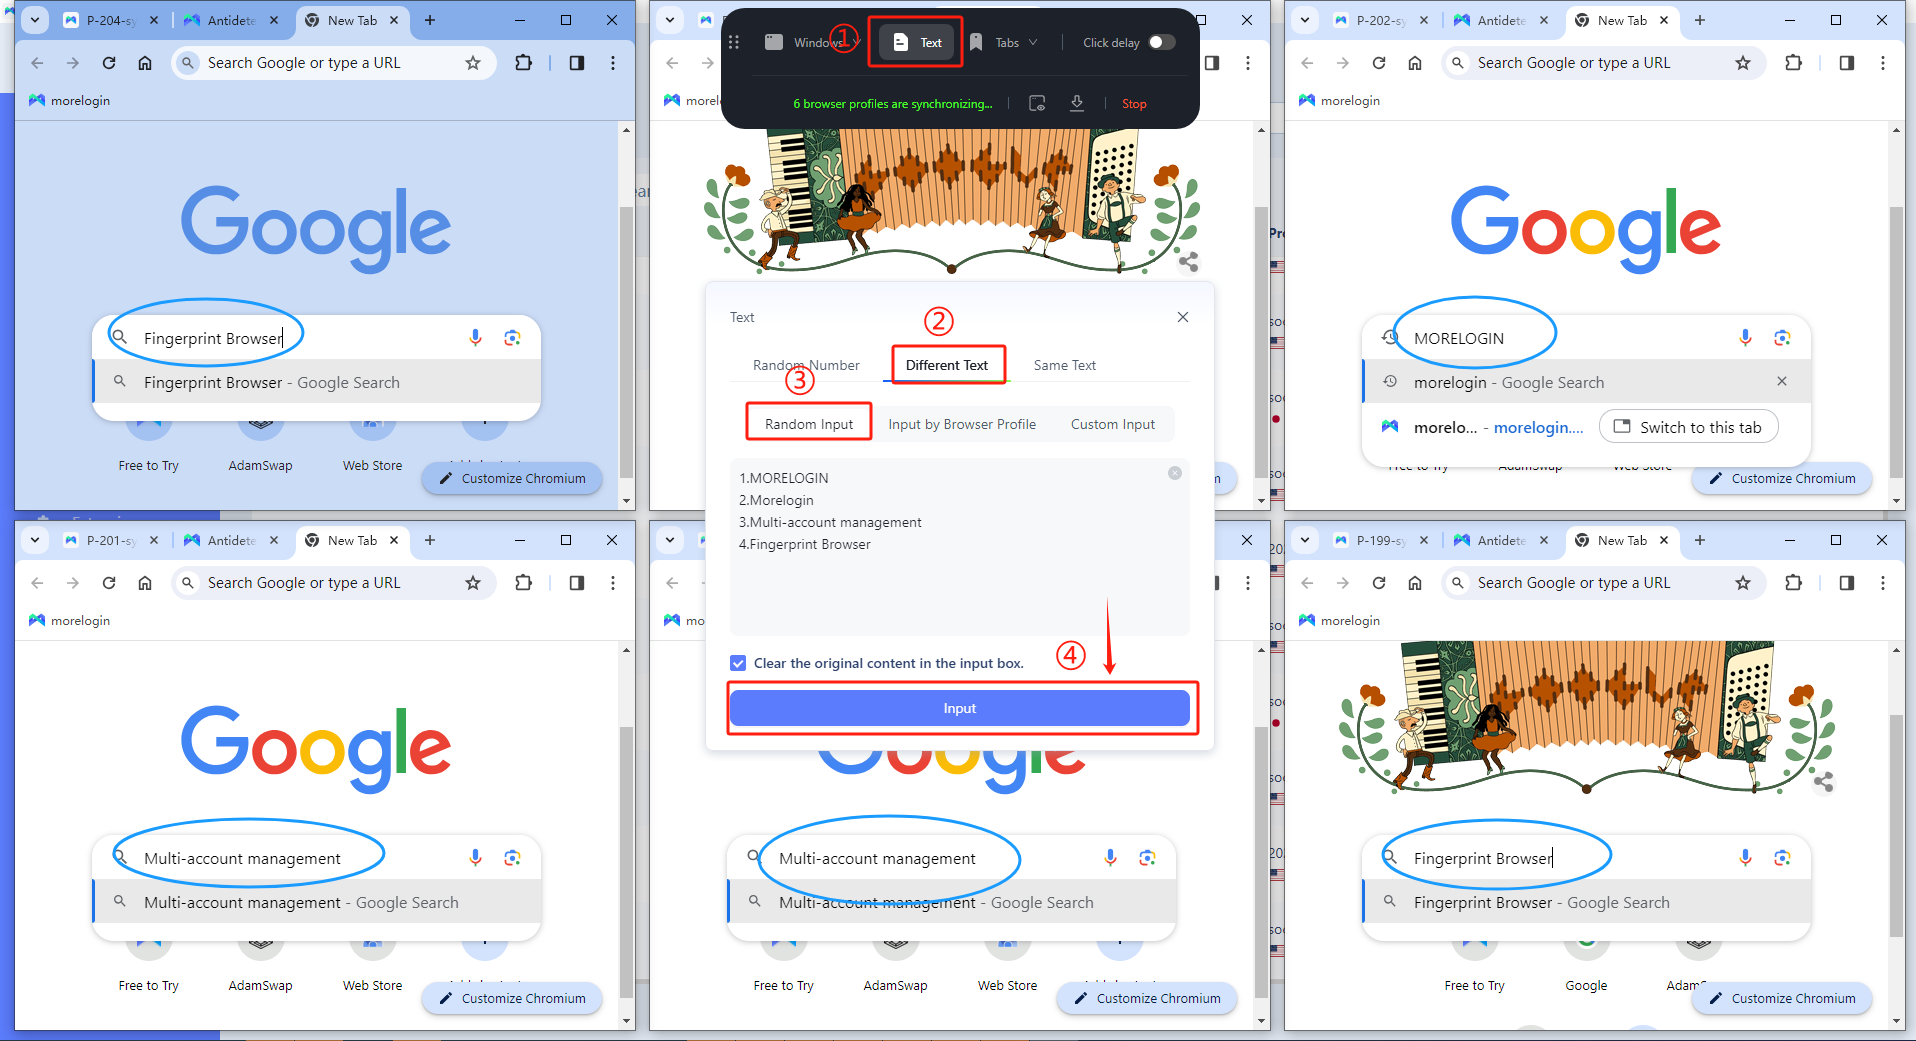
- Text input - Different Text - Random input: Click the synchronizer toolbar at the top, click "Text" - "Different text" - "Random input", enter the content you want to randomly input into the text box, and finally click "Input”, the text will be randomly entered into different browser windows.
- Text Input - Different Text - Input by Browser Profile: Click the synchronizer toolbar at the top, click "Text" - "Different text" - "Input by Browser Profile", and copy and paste the content to be input in each profile into the input box, and finally click "Input". The text will be input into the box of the corresponding profile in the order of the profile name.

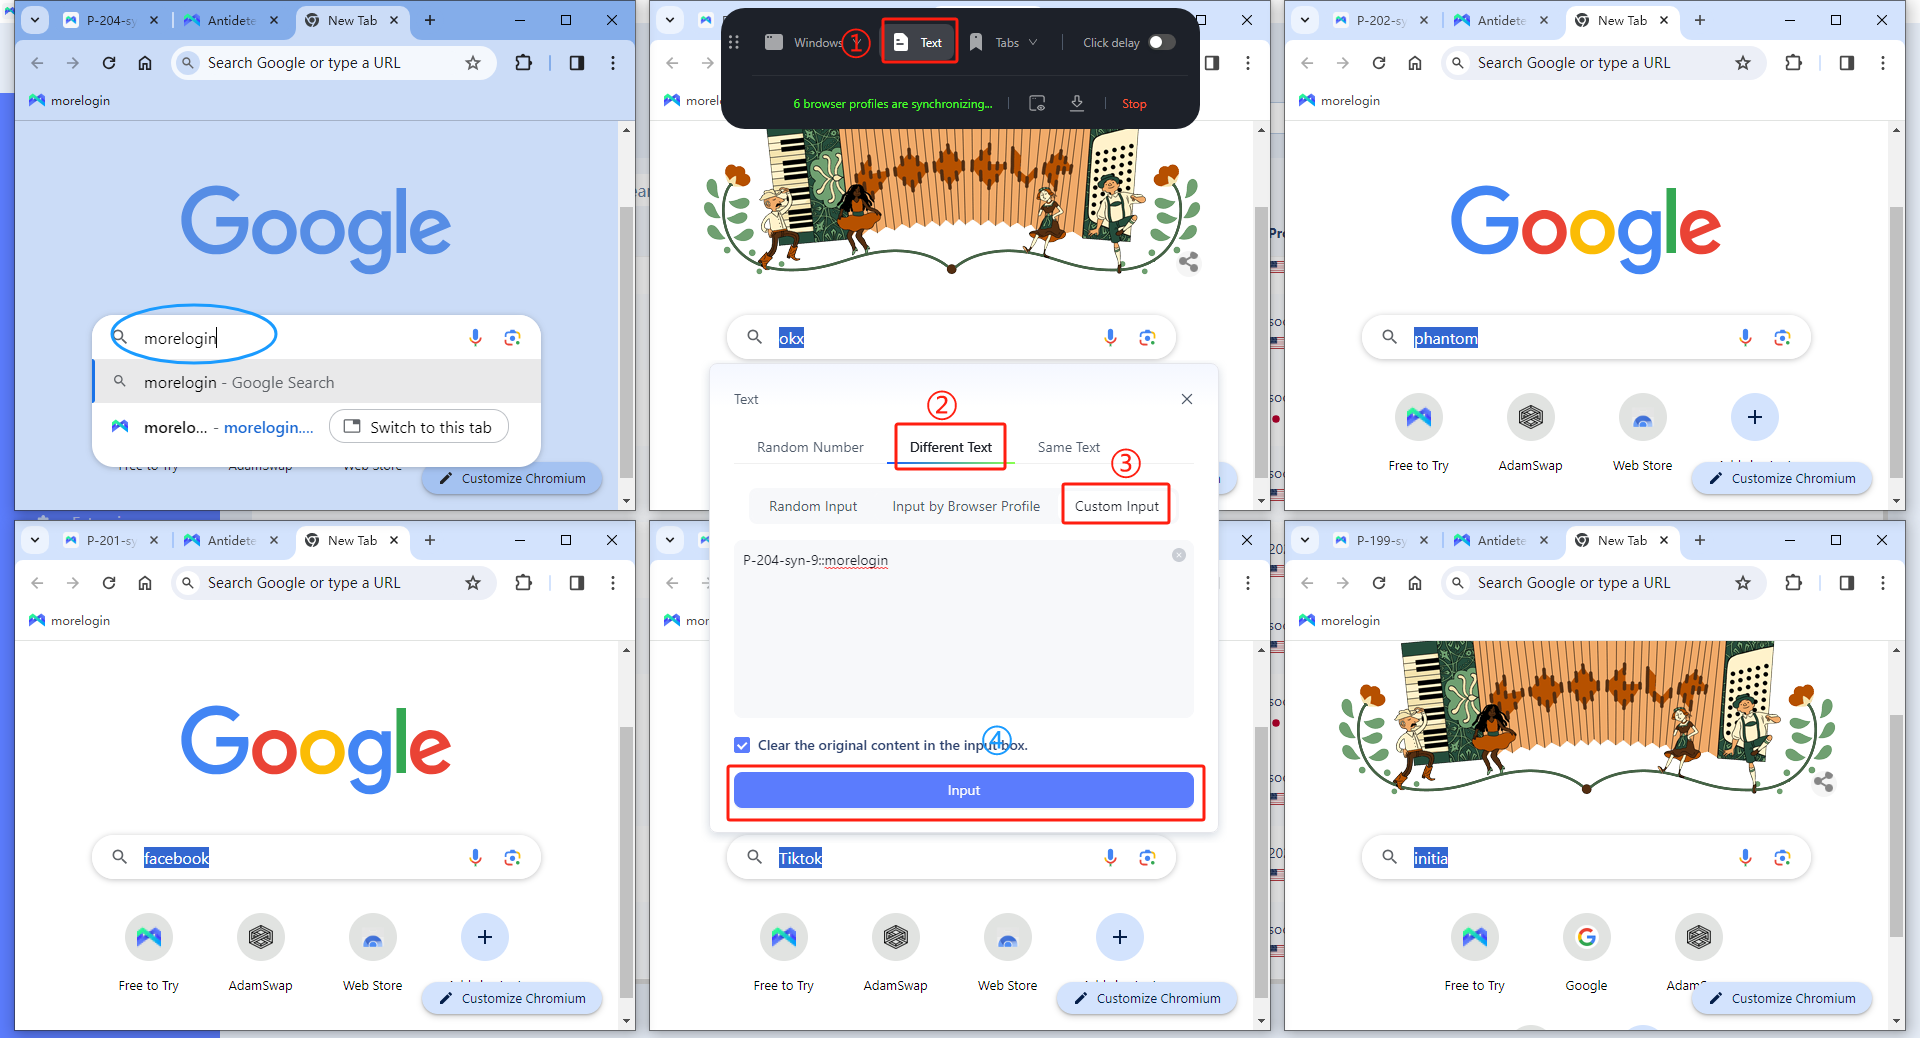
- Text Input - Different Text - Custom input: Click the synchronizer toolbar at the top, click "Text" - "Different text" - "Custom Input", directly enter the profile name and corresponding content, and finally click "Input". The text will be entered into the input box of the corresponding profile according to the profile name.
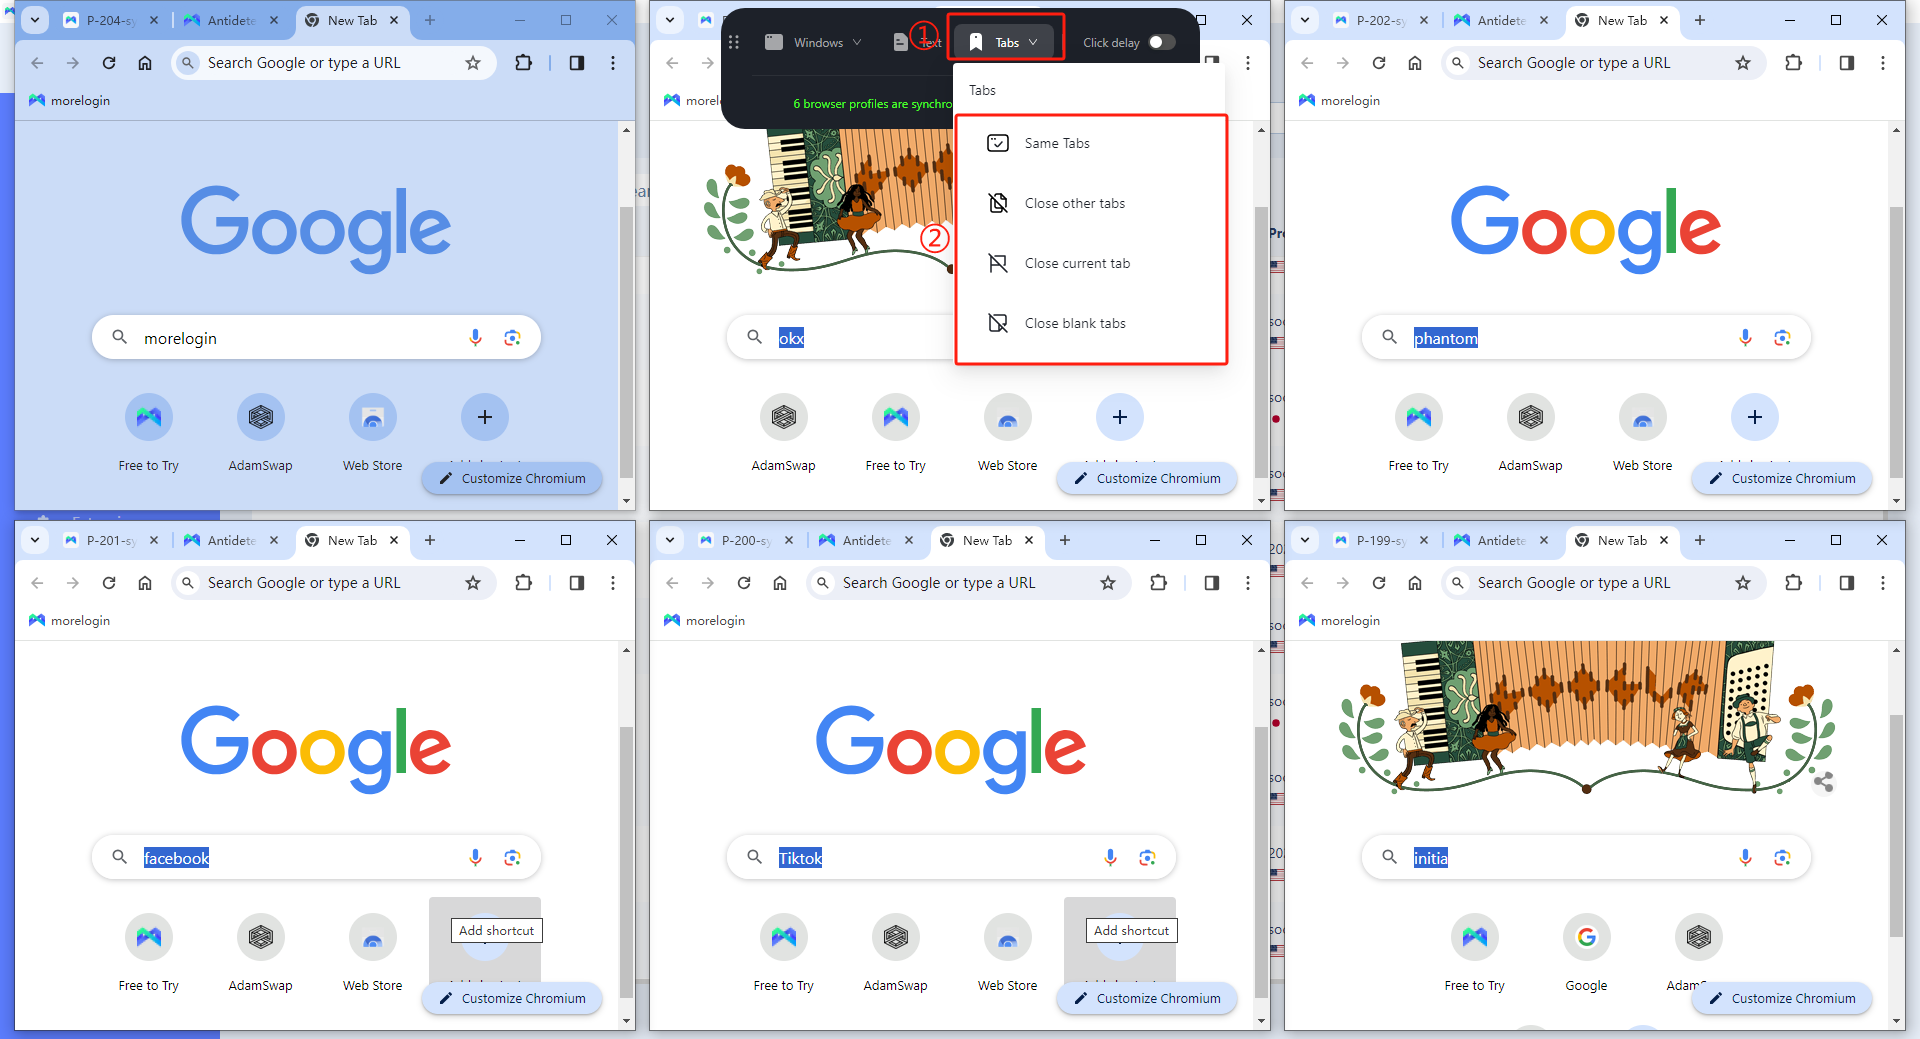
Tabs Arrangement
- Tab management - Same tabs: Once selected, the tabs of all browser windows will be consistent with the main control window.
- Tab management - Close other tabs: Once selected, other tabs in all browser windows will be closed.
- Tab management - Close current tab: Once selected, all browser windows will close the current tab.
- Tab management - Close blank tabs: Once selected, the blank tabs of all browser windows will be closed.
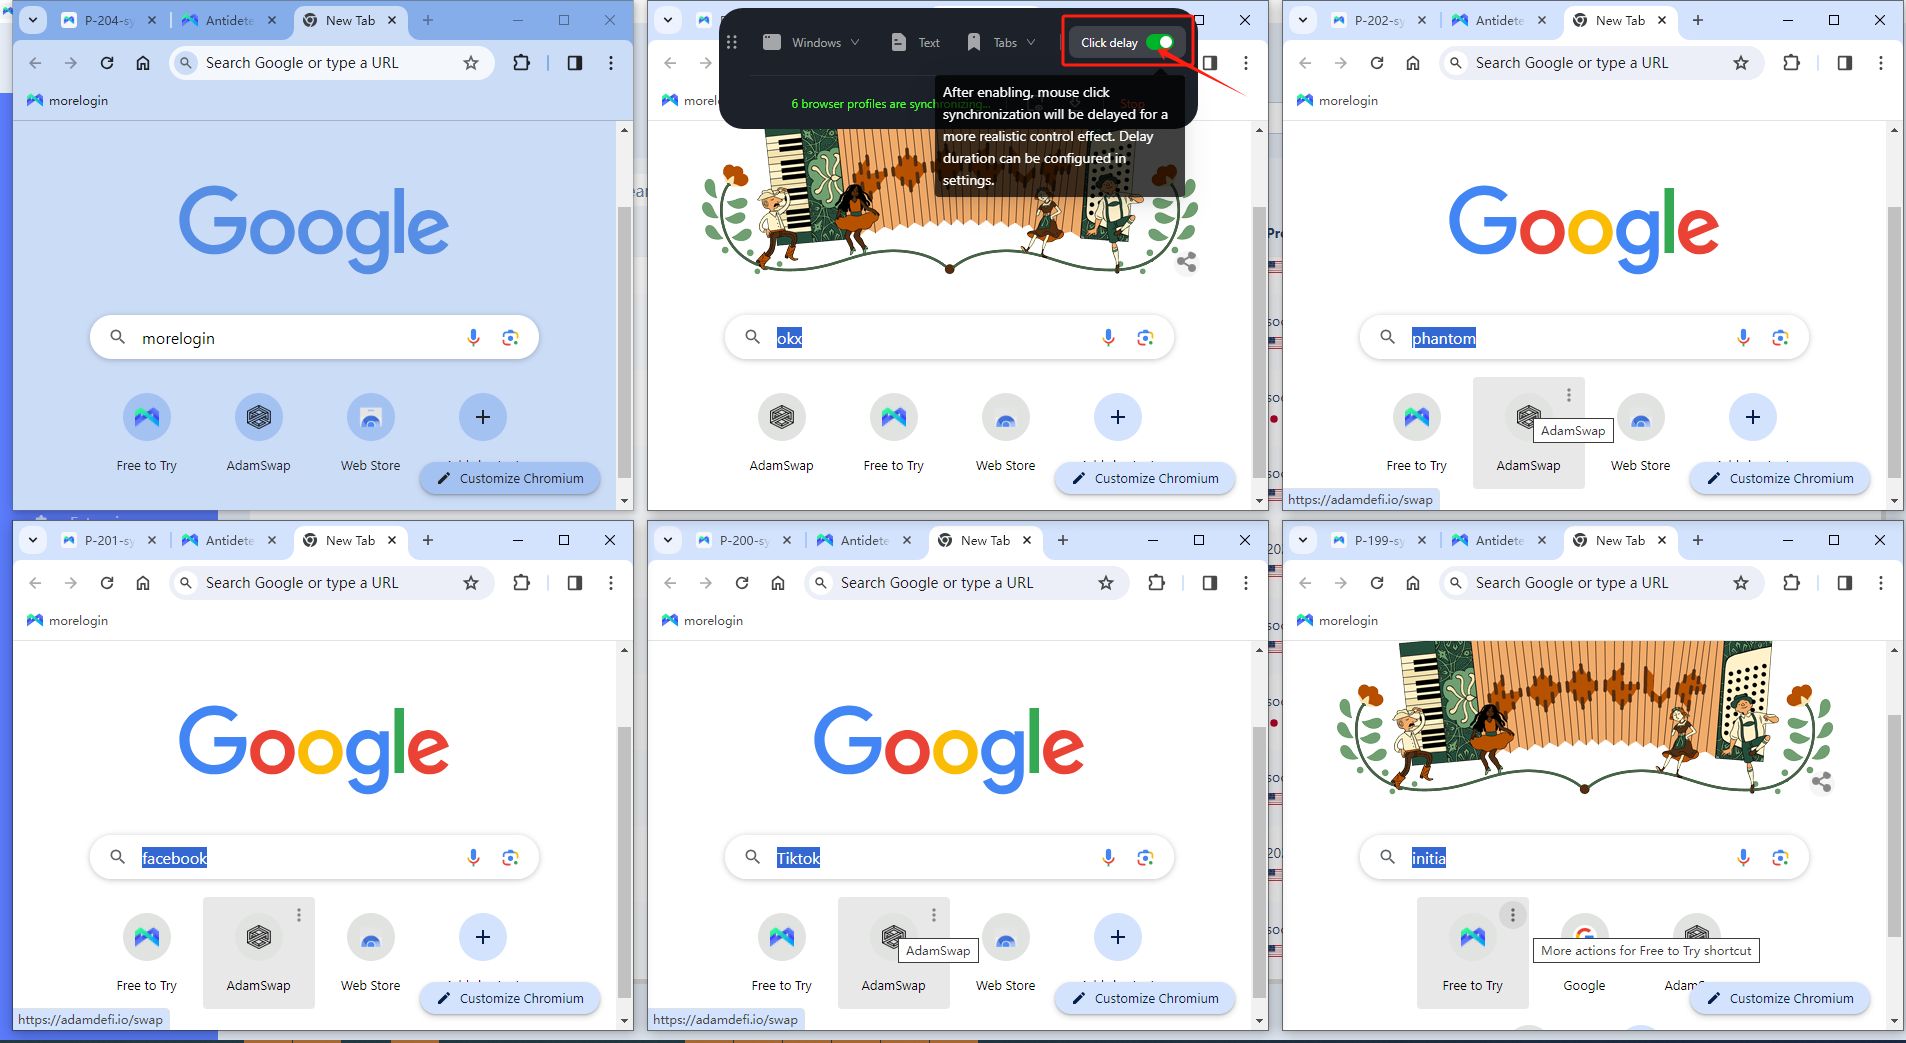
Click Delay
- Click delay: When turned on, the synchronous click operation will be delayed to achieve a more simulated control effect. The delay time can be configured in the settings center.
Synchronizer Toolbar Introduction
- Status: You can see the number of current synchronization profiles, text input and other statuses.
- Display Window: Click to quickly pop up all currently synchronized windows.
- Move to the bottom: The synchronizer toolbar quickly moves to the bottom after clicking.
- Move to the top: Click to quickly move the synchronizer toolbar to the top.
- Stop synchronization: Click to stop browser window synchronization.

Introduction to Synchronizer Settings
- Synchronization Switch: It can control synchronizer keyboard input and synchronize mouse events: click, scroll, track. You can set it up as you want.
- Simulation Input: You can set the interval of character input and click delay.
- Shortcut Keys: You can set shortcut keys for starting synchronization, stopping synchronization, automatic tiling, opening/closing and click delay, and interrupting simulation execution.
Need more help? Contact us: