Tutorial for setting up Webshare's proxies in Morelogin: 2 Methods Explained
In this article we will cover what Webshare is, then, we will shortly cover two different ways to set up Webshare's Proxies in MoreLogin - single proxy setup for light users or batch proxy setup for heavy users. Let's get started!
What is Webshare?
Webshare is the price vs. performance leader in proxy services. From enterprise companies to individual users or small businesses – thousands rely on Webshare for assured availability to market research, price comparison, data aggregation, malware analysis and more.
Focused on practicality for the everyday user, Webshare’s proxy offerings are comprehensive but never break the bank, while each plan comes with a robust set of features one would expect from the most premium providers.
Before starting
To set up Webshare proxies on MoreLogin, you will need an account on Webshare. Webshare offer 10 premium proxies for free for newcomers so make sure to sign up and take advantage of this offer. No coupon codes or credit cards will be needed - 10 free proxies will be assigned to you automatically. Create a Webshare account.

How to set up a single proxy in MoreLogin?
Setting up a single proxy on your MoreLogin account will take 6 simple steps:
1. Download MoreLogin
Download MoreLogin by clicking the Download button on the right top button of the official website.

2. Create New profile
After installing and registering, press on + New profile on the left top side of the App. MoreLogin will generate unique fingerprints for each profile, making sure of profile exclusiveness.

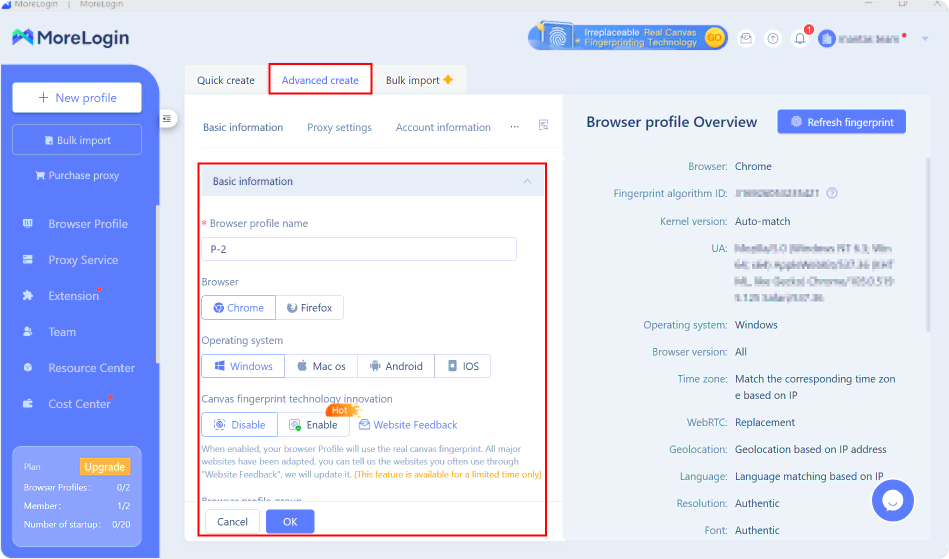
3. Fill out Basic information
Navigate to the Advanced create tab. Fill out Basic information fields. These settings will not impact your proxy connection, feel free to configure and name these as you like.
4. Choose Proxy type
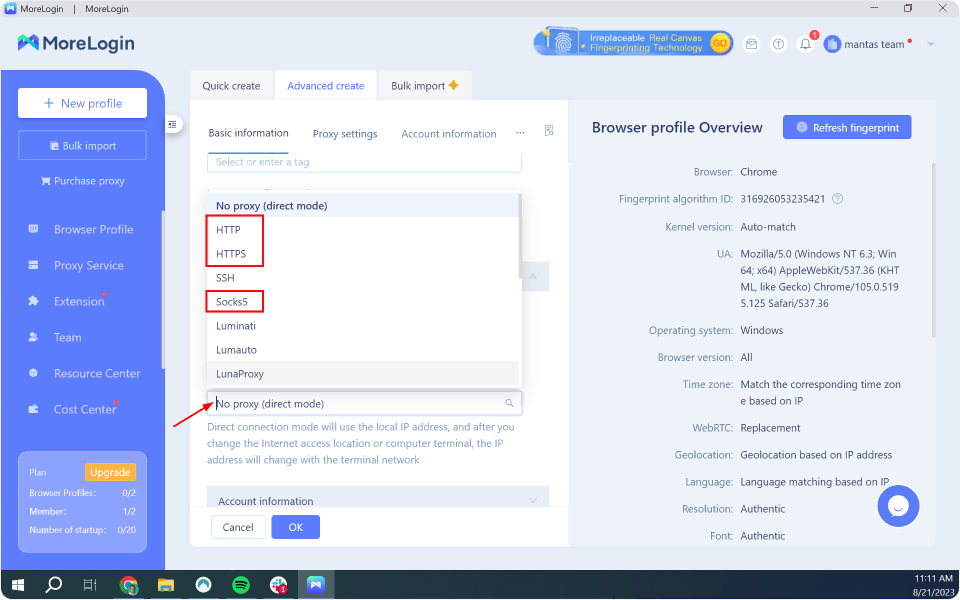
Then, continue to the Proxy settings tab. Under Proxy Option, choose Custom Proxy type.
All Webshare proxies support HTTP and SOCKS5 protocols. For illustration purpose, we will be using the HTTP protocol since MoreLogin is mostly used for browser traffic. It will do great, since HTTP proxies can handle HTTP/HTTPS requests which are often used for retrieving information via web browsers.
5. Fill proxy configuration fields
What you set up here mostly depends on what proxy you prefer to use - rotating or static. For the majority of users static IP address proxies will do just fine, and they should be cheaper in the end as they will use fewer IP addresses in total.
For users who are accessing websites with anti-proxy network measures, it may be best to look at either Residential proxies or buying more datacenter proxies and using IP rotation.
Static IP address configuration
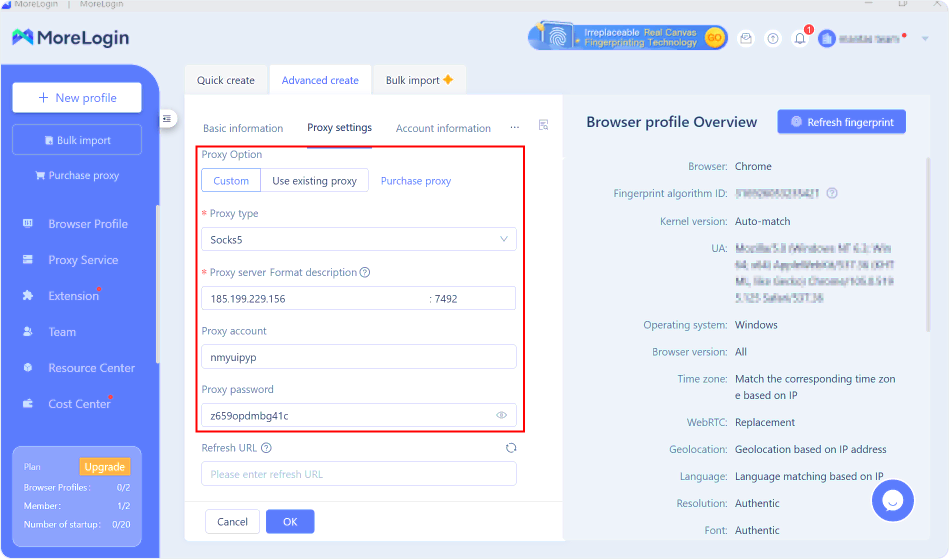
Static IP address proxies include Datacenter proxies and Static residential proxies. We will need some additional information in order to setup Proxy connection - you will find all the needed information in your account’s proxy list page.
Proxy type (Internet protocol): HTTP or SOCKS5.
IP/Host: Proxy Address number (e.g. 185.199.229.156) as noted in your account’s proxy list.
Port: Specific number (e.g. 7492).
Example configuration for static IP address proxy:
Rotating IP address configuration
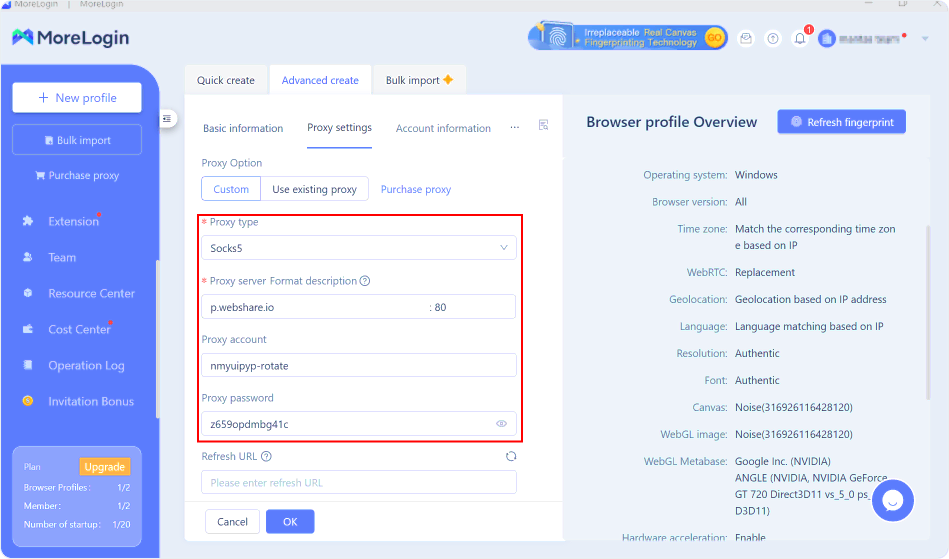
Rotating IP address proxies include Datacenter proxies and Residential proxies. Rotating IP address proxy configuration can be configured using our Rotating Proxy Endpoint. Every user has access to this Endpoint.
Proxy type (Internet protocol): HTTP or SOCKS5.
IP/Host: Domain Name field (e.g. p.webshare.io).
Port: Proxy Port field (e.g. 80).
In order to use country-specific rotating IP addresses, make sure to configure country settings in your Rotating Proxy Endpoint configuration page. You can select preferred countries by clicking the ‘Filter by Country’ button under Proxy Country.
Please note that by changing your Proxy country, your Proxy username field will change too which will be needed for the next step, so make sure to update it to correct values.
Example configuration for rotating IP address proxy:
6. Test your connection
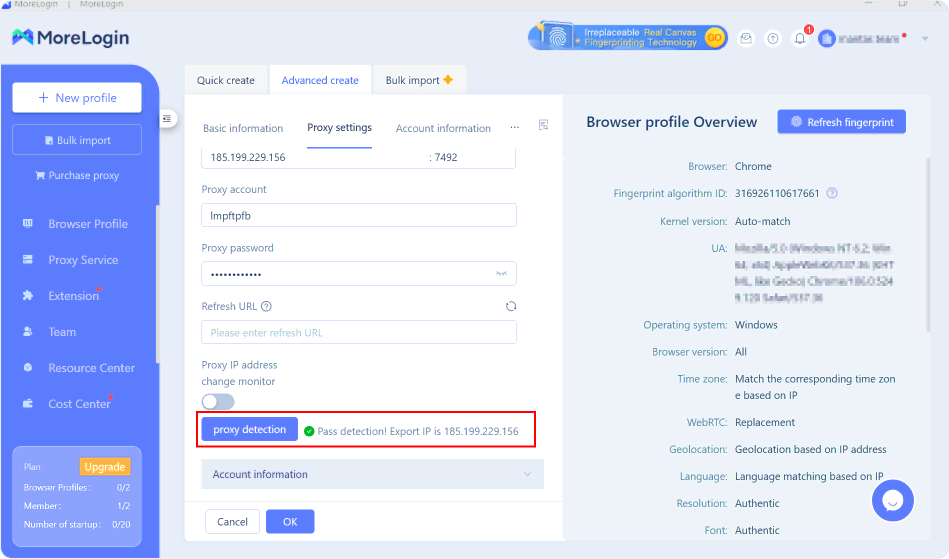
Click Proxy detection to test if your proxy is working. If everything is well you will receive a positive message. In case you receive errors, double-check your configuration to make sure you did not make any mistakes in the setup process.
7. Start using MoreLogin with a proxy
Press Start to launch a new browser profile.
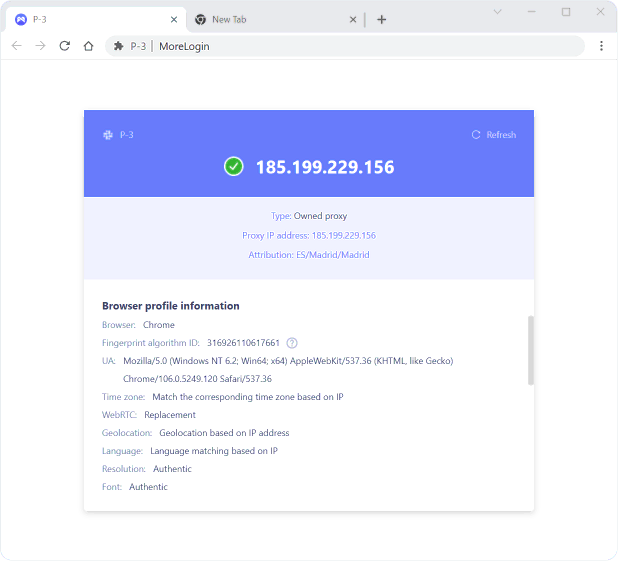
When the browser profile loads, Chromium based browser will pop up, which can be used for your tasks.
You can click on the MoreLogin information tab in the browser to double-check if the information is the same as you setup previously (most importantly - the IP address).
How to set up batch proxies in MoreLogin
Now that you have figured out how to add a single proxy to MoreLogin, you might be wondering how to add multiple proxies simultaneously, especially if you're handling several tasks that require different IPs. The bulk addition can save you considerable time and effort.
Before starting the setup, there are a couple of things to note:
- If the proxy type is not filled, the default type is HTTP.
- Bulk proxies support four proxy types: HTTP, HTTPS, SSH, SOCKS5.
- One proxy per line, up to 100 proxies can be added at a time.
- The fields in the proxy information are not allowed to contain "@" or ":" symbols, which will cause parsing exceptions; if such data exists, please use [Add Proxy-Single Add] function to add.
Let’s continue to bulk proxy setup.
1. Prepare your proxies list: Before you start, ensure that you have your proxies listed in a .txt or .csv file. The most basic format is:
proxyIP:port:username:password
For instance:
192.168.1.1:8080:username1:password1
192.168.1.2:8080:username2:password2
The easiest option for Webshare users is to simply head to their account’s Proxy list page and click the Download button. Proxy configuration will be downloaded in a text file format - simply open the text file, copy all the contents and head to Step 2.

For a more advanced setup to select a specific Proxy type or other fields, make sure to use MoreLogin’s official reference or these two templates (Proxy Host and Proxy Port are required):
Proxy type://Proxy host:Proxy port:Proxy account:Proxy password[Refresh URL]{Group};
Or:
Proxy type://Proxy account:Proxy password@Proxy host:Proxy port[Refresh URL]{Group};
2. Navigate to Proxy Service: Open MoreLogin dashboard, expand the left sidebar and press Proxy Service.
3. Access bulk configuration: Locate and click on the Add proxy button, from drop-down menu click batch add.

4. Paste your proxies: Copy and paste the proxy text file contents directly to the text box on MoreLogin. Proxy table slightly lower on the page should populate with your proxies. It will look similar to this, if you are using a basic setup:
5. Test proxies: It's a good practice to test your proxies after uploading. Click on the proxy detection button to test configuration. If there are any issues with any of the proxies, MoreLogin will notify you. You can also see test results for each individual proxy in the Test results column.
6. Finalize the setup: Click Confirm. Your bulk proxies are now ready to be assigned to various browser profiles.

And that’s it, by now you are able to set up proxies on More Login using two different methods - individually and using batch functions. You are also able to use different types of proxy IP addresses - Rotating or Static.
